Thursday, May 31, 2012

Aimersoft Video Converter Ultimate


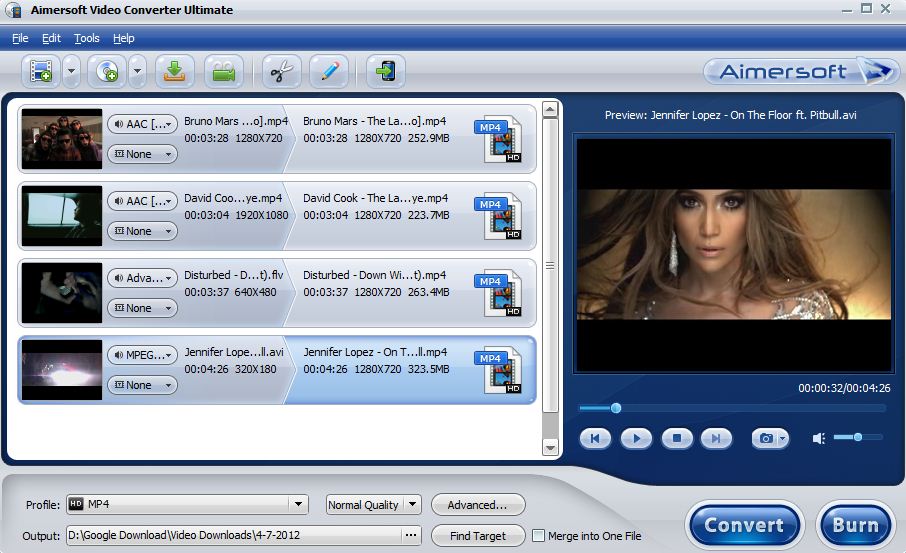
Aimersoft Video Converter Ultimate products is now supported on many devices. Making it the great choice for editing and converting your favorite audios and videos to any format of your choice. Downloading videos from websites will be rub out. Once we've done the setup, it will automatically receive the video playback of active video on screen and loaded it up on its video pane once it's done. After that, we can now have a copy of the video from any site that we want.

In my case I always use it clipping videos of my favorite dance moves and favorite movie scenes. And also for recording videos from youtube (instead of downloading it) specially video tutorials. When it comes to new music videos of my favorite song artist, I always convert them to MP3 and transfer to my device to listen it anytime and anywhere I want to.

As you see, lots and lots of stuff you can do with this software. It's an all-in-one pack and absolutely free,  but if you want more additional functions you need to upgrade it and purchase the product. I had tried a lot of video editing software but non of them surpass this one. Let's have a summary of its features;

  • Clip video
  • Download directly online video
  •  Record video currently playing on screen
  • Video editing
  • Output video could be exported into various devices
  • CD burning
  • File converting

Here's some screen shots of the software interface;
  
MAIN PANE 

VIDEO EDITING
SUPPORTED AUDIO FORMATS


SUPPORTED VIDEO FORMATS


SUPPORTED DEVICES


WANT AIMERSOFT VIDEO CONVERTER ULTIMATE?


3. Use Email and Registration Code from file you downloaded from mediafire.


Saturday, May 26, 2012

Desktop Reminder - 2


Looking for a desktop reminder?....give a shot on this.

In my daily work, it's really hard for me to remember all the things I need to do and sometimes it ends up undone. Until then I was thinking for a solution. Suddenly it came up in my mind to search for a software that will pop-up just in time you setup the task. Since I am so busy almost all the time and have no time for a kind of web surfing I have to gather some sort of advice from different sources wherever in the face of the world (thanks to FACEBOOK for makin it possible). I posted my status that went like this,

"I need to have a desktop reminder that will pop-up or beep or in any way it does to alert me whenever I do a certain task or job. So if anyone out there have that kind of stuff I'll really appreciate if you can help me. ;)"

 and yes it works! One of my virtual friend from Turkey had responded to my queries. He posted the link on my wall (BIG THANKS FOR HIM). That link was for Desktop Reminder - 2. At first I hesitate to download it but since I really needed it so badly I gave it a shot after reading some reviews from the user. 

Well then, so much for that and let me show you how it looks with some screen shots:

1. Its desk top icon,


2. When you open the app you will landed here


Now let's have the summary of the app interface:

  • A. NEW TASK icon - If you have something new task for the day just click on it and input your new task. Note, upon clicking the default time and date will be the present day. If you want to change it click on MODIFY icon located above and customize everything you want.

  • B. REMOVE icon - Use to remove a task currently inputted.

  • C. OPEN icon - Use to open existing task for editing or additional information.

  • D. GROUP icon - Use to group current tasks under customize categories for classification if you have so many task and get lost organizing them. This feature only available for

  • E. TASK pane - Show loaded task as well as the date, time, categories, and recurrence.  Can also be use to open loaded task.

  • F. CALENDAR pane - Show the calendar for each year. Highlighted dates means tasks were loaded.

This is only a summary how Desktop Reminder 2 work and the rest will be for you to discover. As a user of this software I can assure you it's the best compare to other I had used, and the best thing it's free but like other software free version only provide us limited operation and if you want the whole of them you need to update to PRO and will cost you a price (business as well). Updating to PRO will give you the following additional function:


Facebook Windows Desktop Messenger


The craze of facebook seems going more stronger. After a lot of changes they made in this past few months, now they made the new facebook app called "Messenger for Windows" publicly available . Developers are still working a version of the app for Wndows Vista but currently don't for Windows Xp. The app caters the following:

  • chat with facebook friends instantly
  • get notified of the latest updates as notifications will emerge from the right corner of the task bar
  •  even you're not log in on facebook you will be able to scroll the current news feeds


 Before downloading  the app, sign in first to your facebook account on your browser to be automatically logged in after the installation. From then on if you want to use app again, just directly log in the app. When using the app you have a choice whether you log out your account in the browser or in the app alone, which means that even your browser is closed you will still get updates in the app.

The app is still under maintenance and I guess facebook developers should consider the following:

  • When opening the app alone it can't connect to facebook unless you open facebook page in your browser. The app should connect to facebook alone even without opening a browser.
  • When opening the messages and ticker items you will be directed to your browser and you need to log in for viewing the content. It should be viewed directly from the app and not in the browser.

Watch the video for more insights,


Download it here.


Friday, November 4, 2011

Steps to have a “FACEBOOKLIKE BUTTON” for blogspot.com

Since facebook is getting more and more popular many advertisers and innovators used it for commercial purposes. Most of them uses “facebooklike button” on their page to be viewed in users profile who will hit the like button and in return another user might hit the like button again and again and that page will be getting popular and dragging more visitors. Here are some steps for having a facebooklike button on your blog.

1.     Log in to your account in blogspot.com and go to your dashboard. If you are using the old blogger interface your screen will exactly look like this shown below.
Fig. A

2.     As shown in Fig. A, click on the “Design” and your screen will looks like this;

3. As shown on step 2, click on “Edit HTML”, then check the box beside
“Expand Widget Templates” and search for the word <data:post.body/>. Note, before editing your template, you may save a copy of it to recover it again incase anything goes wrong.

4. Go to this url: http://developers.facebook.com/docs/reference/plugins/like/  and the page will show this. Note, “Send Button” box should be unchecked. Fill in the URL to like or your blog URL.

5. As shown in step 4 click on the “Get Code” and you’ll have the code

6.  Click on “IFRAME” for your code to appear and copy it.
7. Back to step 3, after “<data:post.body/>” press “enter” and type “<div class=’facebooklike’>”. Double hit “enter” and type </div>. The blank space underlined with red as shown in the picture is where to paste the code from step 6. Hit “Save Template” to save the changes.
8. If you mess one or more characters on previous steps an error message will appear after saving the changes. But, if all was correct you will have this on your screen


If you are using the updated blogger interface follow this steps;

A.    Image below show the blog dashboard of updated blogger interface user
B.    Click on the dropdown menu as shown here
C.    Click on “Template” and you will have this
D.    Click on “Edit HTML”
E.    Click on “Proceed” and check the box beside “Expand Widget Templates”
F.    Go back to step 3 to step 8 to finish.

Now you have your facebooklike button…HIT LIKE!!!


Friday, October 7, 2011

STEVE JOBS has died! - Apple co-founder and former CEO


The homepage of Apple's website last October 5, 2011 switched to a full-page image of Jobs with the text, "Steve Jobs 1955-2011”. Jobs passed away on October 5, just one day after the debut of the next generation iPhone. Apple announced his death without giving a specific cause. He died peacefully, according to a statement from family members who said they were present during his death. Shortly after learning of Jobs' death, Wozniak told ABC News, "I'm shocked and disturbed”. Those of us who have been fortunate enough to know and work with Steve have lost a dear friend and an inspiring mentor. "Steve leaves behind a company that only he could have built, and his spirit will forever be the foundation of Apple." - Cook wrote in an email to Apple's employees.
In 2004, he beat back an unusual form of pancreatic cancer, and in 2009 it was revealed that he had gone quietly to a Memphis hospital for a liver transplant.  In January 2009, after he announced his second medical leave, Apple stock dropped to $78.20 per share. But it quickly recovered and became one of the most successful stocks on Wall Street. On one day in the summer of 2011, with the stock hitting the $400 level, Apple briefly passed ExxonMobil as the world's most valuable company.
Sources said “members of Apple's board of directors had to persuade him to disclose more about his health as a fiduciary issue interwoven with the health of the company”. After several years of failing health, Jobs announced on Aug. 24, 2011 that he was stepping down as Apple's chief executive.  Jobs said "I have always said if there ever came a day when I could no longer meet my duties and expectations as Apple's CEO, I would be the first to let you know." Jobs wrote in his letter of resignation. "Unfortunately, that day has come." Before resigning as CEO six weeks ago, Jobs became Apple's chairman and handed the CEO jobs over to his hand-picked successor, Tim Cook.
Analysts said Apple performed well during Jobs' absence, partly because he was available for big decisions and partly because his chief lieutenant, Tim Cook, was the hands-on manager even when Jobs was there.
Jobs remained stubbornly private about his personal life, refusing interviews and shielding his wife and their children from public view. He was so successful at keeping the details of his life out of the celebrity pages that a Pew poll in June 2010 found that only 41 percent of Americans correctly identified Jobs as head of Apple. A CBS poll that year concluded that 69 percent of Americans didn't know enough about Jobs. "He's never been a media person," said industry analyst Tim Bajarin, president of Creative Strategies, after Jobs resigned. 

Monday, October 3, 2011

TIPS ON HOW TO USE THE ZERO FACEBOOK OFFERED BY SUN CELLULAR

                Be sure your cell phone support WAP services. These are now the steps to configure your internet connection for 0facebook.  
1.       Activate your Sun Cellular SIM GPRS by texting “GET IT” without quotes and send to 2300. If your phone GPRS is already enabled go directly to step 3.

a.       After seconds you may receive a reply from 2300 and asking you to reply with a number of your choice. But in some cases not all cell phone models will receive a reply nor can be configure especially China phones and the like.
b.      After following the steps that will be texted, you will receive a text prompting you to configure your cell phone manually. Take note you don’t have to worry about this because this text is automated, which means that even the network can configure your phone you will still receive this kind of message.
c.       For those kinds of cell phones especially China phones that could not be configure, you need to see an expert for manual configuration. Don’t do it by yourself if you’re not sure that you can make it to refrain from damages on your phone settings which may lead to more complex situation.
d.      If you really want to try manual configuration of your cell phone and also for China phones follow this link for step by step configuration: http://geekyandtechy.blogspot.com/2011/10/manual-configuration-of-internet.html
e.      It’s not applicable for IPHONE users since IPHONE doesn’t support WAP services.

2.       After receiving the configuration settings from Sun Network install and save all of it.

3.       On your phone go to web and go to your default homepage which is the Sun Cellular and look for 0.facebook.com banner.


a.       Some phone models needs to be refreshed before it will be connected to the internet. You can do this by turning your phone off and turning it on again.

4.       Click on the 0.facebook.com banner that will be seen on the site. Then log-in with your email and password.

5.       You can also directly go to http://0.facebook.com on your phone URL search tab.


6.       For your ease of visiting http://0.facebook.com  all over again on your cell phone just bookmark it during the time you log-in on your facebook account using 0.facebook. Every time you want to open your account again just go to your bookmarks and click on the site. Note, after using 0.facebook, don’t log-out your account, just exit your phone browser or else you have to log-in on your account all over again which is more time consuming. Another thing to remember “don’t let anyone use 0.facebook on your phone if you didn’t log-out your account unless you give your permission”.

7.       That’s it! Enjoy facebook on the go!

AFTER YOUR PHONE HAS BEEN CONFIGURED, HERE ARE SOME STEPS THAT MAY GIVE YOU MORE KNOWLEDGE ON MAXIMIZING THE USE OF SUN CELLULAR 0FACEBOOK.

Activating your text notifications;

1.       If your text notifications weren’t activated yet, everytime you log-in on your facebook account using 0facebook you will always see a note indicated on the upper part of the site asking you to activate your SMS notifications. Just click on it and follow the instructions. By doing this you should have at least P10 regular load on your Sun Cellular SIM because this operation includes some queries not covered by the free site (0.facebook.com)
2.       After doing step 1 go back to 0facebook and log-in your account so you can edit your default SMS settings by following these;

Home >Settings (on the lower part of homepage)>SMS (change everything what you want to change and don’t forget to save everything)

3.       After activating  SMS notification you will be notified everytime when someone leave comments on your statuses, when someone wants to be your friend, when someone posted on your wall, when someone leave comments on your photo, when someone tagged you a photo, when someone poked you, and when someone message you. It all depends on how you will manage your SMS alert as stated on step 2.

4.       If you want to be always updated on your friends, crush, idols, and love ones statuses just go to his/her profile and click on the “subscribe via SMS” located on the lower part on his/her profile page. After then you will be notify every updates of their status. Once you will give like or leave a comment on their status you will also receive SMS everytime any other friend of him/her commented also on his/her statuses (only applicable to your friends’ status you are subscribed with).

Other features;

1.       Like any other pages such as news, sports, technologies, science and any other to receive updates via SMS and read it on 0.facebook.
2.       Group updates can also be viewed on 0.facebook. You can post, leave comments, read a document and can add friend to a group.

Advantages on 0facebook

1.       Since doesn’t includes photos and videos (which slow down browsing on cell phone), it will give us fast browsing experience dependent on how advance is your phone modem and signal strength.

2.       It’s almost the same as you are on facebook page using your computer. The only differences are:  small screen of course, chat messages landed on your message inbox, it doesn’t play videos and shows photos and you can’t check-in on a place.

Saturday, October 1, 2011

Manual Configuration Of Internet Settings For Cellular Phones

For China Made Cellular Phones


Not all China phone models have the same items to be configured as what are listed here. Some models use other terms but it’s always have the same meaning.

Smart Buddy SIM

Internet Settings

1.       SECURITY – (forbidden or activate) choose forbidden
2.       USER MANUAL – leave it blank
3.       PASSWORD - leave it blank
4.       APN – mms
5.       GATEWAY IP ADDRESS – 010.102.061.046
6.       GATEWAY PORT – 8080
7.       RENAME – SMART MMSERNET
8.       SET AS HOMEPAGE – http://m.smart.com.ph
9.       ADVANCED SETTINGS – DNS – 000.000.000.000
Network type – HTTP
MMS Settings

1.       SECURITY – (forbidden or activate) choose forbidden
2.       USER MANUAL – leave it blank
3.       PASSWORD - leave it blank
4.       APN – mms
5.       GATEWAY IP ADDRESS – 010.102.061.046
6.       GATEWAY PORT – 8080
7.       RENAME – SMART MMS
8.       SET AS HOMEPAGE – http://10.102.61.238:8002/
9.       ADVANCED SETTINGS – DNS – 000.000.000.000
Network type – HTTP

FOR SAMSUNG TOUCHSCREEN CELLPHONES

On other brands of cellular phones not all items listed below are available. Somehow they have their own terms, much easier and not complicated as this to configure.

Talk ‘N Text 
                                     
GPRS SETTINGS

1.       SET NAME – Smart GPRS
2.       HOME URL – http://wap.smart.com.ph
3.       BEARER – GPRS only
4.       PROXY – On
5.       ADDRESS – 10.102.61.46
6.       PORT – 8080
7.       DNS1 – 0.0.0.0
8.       DNS2 – 0.0.0.0
9.       GPRS SETTINGS – ACCESS NAME – smart1
   USER I.D. -           blank
   PASSWORD     -  blank
10.   GSM SETTINGS – NUMBER – blank
   USER I.D. – blank
   PASSWORD – blank
   TYPE  - ISDN

Smart MMS SETTINGS

1.       SET NAME – Smart MMS
2.       HOME URL – http://10.102.61.238:8002
3.       BEARER – GPRS only
4.       PROXY – On
5.       ADDRESS – 10.102.61.46
6.       PORT – 8080
7.       DNS1 – 0.0.0.0
8.       DNS2 – 0.0.0.0
9.       GPRS SETTINGS – ACCESS NAME – mms
   USER I.D. -           blank
   PASSWORD     -  blank
10.   GSM SETTINGS – NUMBER – blank
   USER I.D. – blank
   PASSWORD – blank
   TYPE  - ISDN
Smart Internet  SETTINGS 1

1.       SET NAME – Smart Internet
2.       HOME URL – http://wap.smart.com.ph
3.       BEARER – GPRS only
4.       PROXY – OFF
5.       ADDRESS – 10.102.61.46
6.       PORT – 80
7.       DNS1 – 0.0.0.0
8.       DNS2 – 0.0.0.0
9.       GPRS SETTINGS – ACCESS NAME – internet
   USER I.D. -           blank
   PASSWORD     -  blank
10.   GSM SETTINGS – NUMBER – blank
  USER I.D. – blank
  PASSWORD – blank
  TYPE  - ISDN

Smart Internet  SETTINGS 2

1.       SET NAME – SMART INTERNET
2.       HOME URL – http://m.smart.com.ph
3.       BEARER – GPRS only
4.       PROXY – OFF
5.       ADDRESS – 10.102.61.46
6.       PORT – 8080
7.       DNS1 – 0.0.0.0
8.       DNS2 – 0.0.0.0
9.       GPRS SETTINGS – ACCESS NAME – internet
   USER I.D. -           blank
   PASSWORD     -  blank
10.   GSM SETTINGS – NUMBER – blank
  USER I.D. – blank
  PASSWORD – blank
  TYPE  - ISDN

SUNCELLUAR SIM

GPRS SETTINGS

1.       SET NAME – SUN WAP GPRS
2.       HOME URL – http://wap.suncellular.com.ph
3.       BEARER – GPRS only
4.       PROXY – On
5.       ADDRESS – 202.138.159.78
6.       PORT – 8080
7.       DNS1 – 0.0.0.0
8.       DNS2 – 0.0.0.0
9.       GPRS SETTINGS – ACCESS NAME – wap
   USER I.D. -           blank
   PASSWORD     -  blank
10.   GSM SETTINGS – NUMBER – blank
  USER I.D. – blank
  PASSWORD – blank
  TYPE  - ISDN

MMS SETTINGS

1.       SET NAME – SUN MMS
2.       HOME URL – http://mmscenter.suncellular.com.ph
3.       BEARER – GPRS only
4.       PROXY – On
5.       ADDRESS – 202.138.159.78
6.       PORT – 8080
7.       DNS1 – 0.0.0.0
8.       DNS2 – 0.0.0.0
9.       GPRS SETTINGS – ACCESS NAME – mms
   USER I.D. -           blank
   PASSWORD     -  blank
10.   GSM SETTINGS – NUMBER – blank
  USER I.D. – blank
  PASSWORD – blank
  TYPE  - ISDN

INTERNET SETTINGS

1.       SET NAME – SUN INTERNET
2.       HOME URL – http://www.suncellular.com.ph
3.       BEARER – GPRS only
4.       PROXY – Off
5.       ADDRESS – 0.0.0.0
6.       PORT – 80
7.       DNS1 – 0.0.0.0
8.       DNS2 – 0.0.0.0
9.       GPRS SETTINGS – ACCESS NAME – minternet
   USER I.D. -           blank
   PASSWORD     -  blank
10.   GSM SETTINGS – NUMBER – blank
  USER I.D. – blank
  PASSWORD – blank
  TYPE  - ISDN